
We’re gonna first install the system using the default btrfs setup for Ubuntu with only a few option changes.
After installing the system, we’re going to create our custom subvolumes in a nested structure (unlike most other guides that use a flat layout). We are also going to let /boot be part of the snapshots and only put /boot/efi in its own partition. I am using Kubuntu as an example here, but you can easily change that to your own Ubuntu spin or even use Debian with minor tweaks.
Boot into the live environment of your installation medium. Open a terminal and change the password of the root user to something easy using:
| |
and then change the user to root using
| |
This helps us avoid using sudo at the beginning of each command. The rest of the guide assumes you’re the root user.
Change the default btrfs partition configuration
First, we need to modify the configuration file for partman that the installer uses for partitioning the disks.
Open /usr/lib/partman/mount.d/70btrfs with a text editor and add the options noatime,compress=zstd,space_cache=v2 alongside subvol as specified below:
| |
Start the installer and proceed with the installation as you normally would.
Disk partition
- Create an EFI system partition with around 512 MB of space
- Create another partition that spans the rest of the disk, format it with btrfs and set the mount point at
/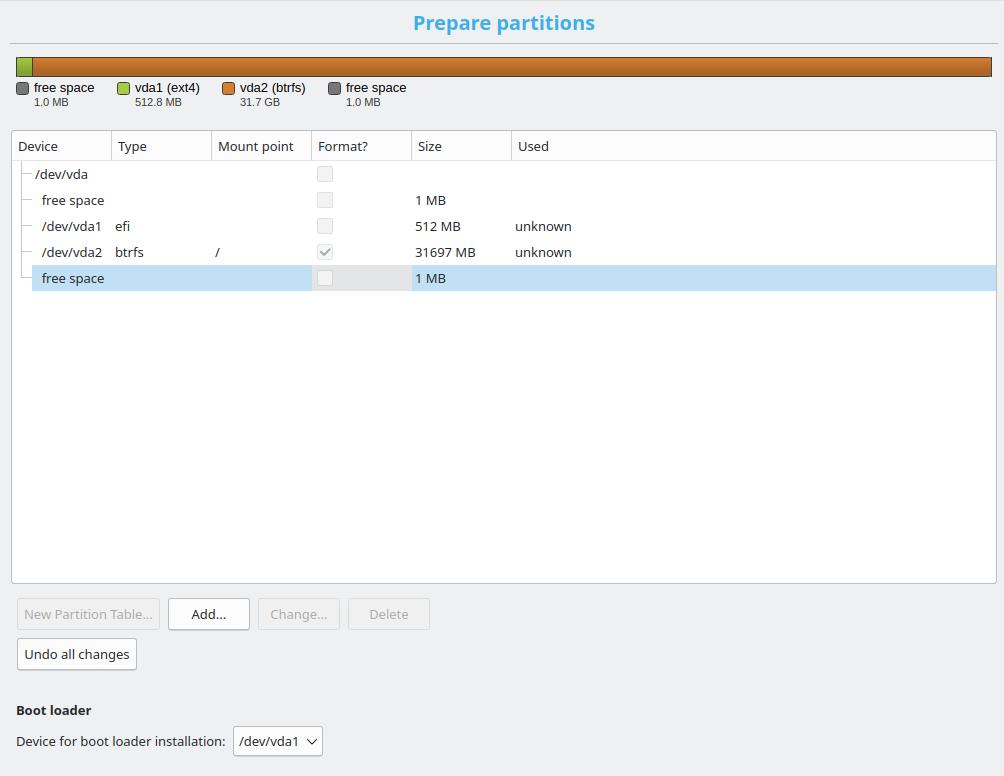
Choose the partition that you created for EFI (EFI System Partition) to install the bootloader to and proceed with the installation to the end. DO NOT boot into the installed system just yet and stay in the live environment (do not restart).
Creating the necessary subvolumes
We will be using the nested subvolume layout as described in the btrfs documentation.
Mount the btrfs partition that you installed your system on using the same options you used in the previous section to /mnt. For example:
root@kubuntu:~# mount /dev/vda2 -o noatime,compress=zstd,space_cache=v2 /mnt
You should see the following two directories under /mnt:
root@kubuntu:~# ls /mnt
@  @home
Go to /mnt/@ and remove the following empty directories:
root@kubuntu:/mnt/@# rm -rf opt/ tmp/ srv/ home/
Rename the following directories and add .bak to the end of their names:
root@kubuntu:/mnt/@# mv root/ root.bak
root@kubuntu:/mnt/@# mv var/ var.bak
root@kubuntu:/mnt/@# mv boot/grub/x86_64-efi boot/grub/x86_64-efi.bak
Create an empty directory called var
root@kubuntu:/mnt/@# mkdir -p var/lib
root@kubuntu:/mnt/@# mkdir -p root
Create the following subvolumes under @:
btrfs subvolume create /mnt/@/boot/grub/x86_64-efi
btrfs subvolume create /mnt/@/home
btrfs subvolume create /mnt/@/root
btrfs subvolume create /mnt/@/opt
btrfs subvolume create /mnt/@/srv
btrfs subvolume create /mnt/@/tmp
btrfs subvolume create /mnt/@/var/log
btrfs subvolume create /mnt/@/var/crash
btrfs subvolume create /mnt/@/var/cache
btrfs subvolume create /mnt/@/var/tmp
btrfs subvolume create /mnt/@/var/opt
btrfs subvolume create /mnt/@/var/spool
btrfs subvolume create /mnt/@/var/lib/flatpak
Go to var and change disable Copy-on-Write for the created directories:
root@kubuntu:/mnt/@/var# chattr +C cache/ crash/ tmp/ opt/ log/ spool/ lib/flatpak/
You can use lsattr to check and see if CoW has correctly been disabled.
Now move the contents of @home, root.bak, and var.bak to the new locations: (ignore any errors for root.bak, since it might be empty of non-hidden files)
mv /mnt/@home/{.,}* /mnt/@/home
mv /mnt/@/root.bak/{.,}* /mnt/@/root
mv /mnt/@/boot/grub/x86_64-efi.bak/* /mnt/@/boot/grub/x86_64-efi

cp -a --reflink=never /mnt/@/var.bak/crash/. /mnt/@/var/crash/
cp -a --reflink=never /mnt/@/var.bak/cache/. /mnt/@/var/cache/
cp -a --reflink=never /mnt/@/var.bak/log/.   /mnt/@/var/log/
cp -a --reflink=never /mnt/@/var.bak/spool/. /mnt/@/var/spool/
cp -a --reflink=never /mnt/@/var.bak/tmp/.   /mnt/@/var/tmp/
cp -a --reflink=never /mnt/@/var.bak/opt/.   /mnt/@/var/opt/
Go to var.bak and remove the copied directories:
root@kubuntu:/mnt/@/var.bak# rm -rf crash/ cache/ tmp/ opt/ log/ spool/
Copy the rest of var.bak to var
cp -a /mnt/@/var.bak/. /mnt/@/var
remove the following directories:
rm -rf /mnt/@/root.bak /mnt/@/var.bak /mnt/@/boot/grub/x86_64-efi.bak/
and remove the @home subvolume:
btrfs subvolume delete /mnt/@home/
The final subvolume layout should look like this:
root@kubuntu:~# sudo btrfs subvolume list -apt /mnt
ID	gen	parent	top level	path
--	---	------	---------	----
256	81	5	5		@
258	65	256	256		<FS_TREE>/@/home
259	69	256	256		<FS_TREE>/@/root
260	54	256	256		<FS_TREE>/@/opt
261	55	256	256		<FS_TREE>/@/srv
262	56	256	256		<FS_TREE>/@/tmp
269	64	256	256		<FS_TREE>/@/var/lib/flatpak
270	78	256	256		<FS_TREE>/@/var/log
271	77	256	256		<FS_TREE>/@/var/crash
272	78	256	256		<FS_TREE>/@/var/cache
273	77	256	256		<FS_TREE>/@/var/tmp
274	77	256	256		<FS_TREE>/@/var/opt
275	77	256	256		<FS_TREE>/@/var/spool
276	84	256	256		<FS_TREE>/@/boot/grub/x86_64-efi
Edit the fstab file at /mnt/@/etc/fstab and add the following entries (change the UUID accordingly)
UUID=1A5D-5465                             /boot/efi              vfat     umask=0077                                                                   0       1
UUID=84cc93cb-d382-45f8-a0f0-79a0316ba88f  /                      btrfs    defaults,noatime,compress=zstd,space_cache=v2                                0       0
UUID=84cc93cb-d382-45f8-a0f0-79a0316ba88f  /home                  btrfs    defaults,subvol=@/home,noatime,compress=zstd,space_cache=v2                  0       0
UUID=84cc93cb-d382-45f8-a0f0-79a0316ba88f  /root                  btrfs    defaults,subvol=@/root,noatime,compress=zstd,space_cache=v2                  0       0
UUID=84cc93cb-d382-45f8-a0f0-79a0316ba88f  /opt                   btrfs    defaults,subvol=@/opt,noatime,compress=zstd,space_cache=v2                   0       0
UUID=84cc93cb-d382-45f8-a0f0-79a0316ba88f  /srv                   btrfs    defaults,subvol=@/srv,noatime,compress=zstd,space_cache=v2                   0       0
UUID=84cc93cb-d382-45f8-a0f0-79a0316ba88f  /tmp                   btrfs    defaults,subvol=@/tmp,noatime,compress=zstd,space_cache=v2                   0       0
UUID=84cc93cb-d382-45f8-a0f0-79a0316ba88f  /var/lib/flatpak       btrfs    defaults,subvol=@/var/lib/flatpak,noatime,compress=zstd,space_cache=v2       0       0
UUID=84cc93cb-d382-45f8-a0f0-79a0316ba88f  /var/log               btrfs    defaults,subvol=@/var/log,noatime,compress=zstd,space_cache=v2               0       0
UUID=84cc93cb-d382-45f8-a0f0-79a0316ba88f  /var/crash             btrfs    defaults,subvol=@/var/crash,noatime,compress=zstd,space_cache=v2             0       0
UUID=84cc93cb-d382-45f8-a0f0-79a0316ba88f  /var/cache             btrfs    defaults,subvol=@/var/cache,noatime,compress=zstd,space_cache=v2             0       0
UUID=84cc93cb-d382-45f8-a0f0-79a0316ba88f  /var/tmp               btrfs    defaults,subvol=@/var/tmp,noatime,compress=zstd,space_cache=v2               0       0
UUID=84cc93cb-d382-45f8-a0f0-79a0316ba88f  /var/opt               btrfs    defaults,subvol=@/var/opt,noatime,compress=zstd,space_cache=v2               0       0
UUID=84cc93cb-d382-45f8-a0f0-79a0316ba88f  /var/spool             btrfs    defaults,subvol=@/var/spool,noatime,compress=zstd,space_cache=v2             0       0
UUID=84cc93cb-d382-45f8-a0f0-79a0316ba88f  /boot/grub/x86_64-efi  btrfs    defaults,subvol=@/boot/grub/x86_64-efi,noatime,compress=zstd,space_cache=v2  0       0
Set the default subvolume for your btrfs file system to @
btrfs subvolume set-default /mnt/@
Disable updatedb indexing for snapshots
To disable the indexing of snapshots, simply edit the file /mnt/@/etc/updatedb.conf and add .snapshots to the list of PRUNENAMES (you may need to uncomment it first)
PRUNENAMES=".snapshots"
Restart the system and boot into your new installation.
Install the necessary packages
First install snapper and snapper-gui using apt.
sudo apt install snapper snapper-gui
Then install grub-btrfs from source; the instructions are available in the README of its repository. Make sure you install the required dependencies such as inotify-tools beforehand. (at the time of writing it is not yet available in the repos)
Create snapper config
Run the following command to create a configuration named root for the all the files under our root directory (only stopping at subvolume boundaries)
sudo snapper -c root create-config /
This should create a new subvolume named .snapshots nested under subvolume @ along with its corresponding directory at /.snapshots. Run the following command to see it:
root@kubuntu:~$ btrfs subvolume list -apt /
ID      gen     parent  top level       path
--      ---     ------  ---------       ----
256     231     5       5               <FS_TREE>/@
258     231     256     256             @/home
259     128     256     256             @/root
260     54      256     256             @/opt
261     55      256     256             @/srv
262     230     256     256             @/tmp
269     64      256     256             @/var/lib/flatpak
270     231     256     256             @/var/log
271     213     256     256             @/var/crash
272     231     256     256             @/var/cache
273     214     256     256             @/var/tmp
274     77      256     256             @/var/opt
275     224     256     256             @/var/spool
276     84      256     256             @/boot/grub/x86_64-efi
277     231     256     256             @/.snapshots
A new configuration file at /etc/snapper/configs/root is also created. Please refer to the snapper documentation and change the options to your liking. Make sure you add your username to ALLOW_USERS. I personally reduce the number of timeline snapshots to once a week or turn them off entirely. I also reduce the NUMBER_LIMIT to 10.
Edit /etc/fstab and add a mount point for .snapshots just like the other subvolumes.
UUID=84cc93cb-d382-45f8-a0f0-79a0316ba88f /.snapshots btrfs defaults,subvol=@/.snapshots,noatime,compress=zstd,space_cache=v2 0 0
Enable systemd timers and services
Enable this timer to allow snapper to take time-based snapshots based on the configuration you provided.
sudo systemctl enable --now snapper-timeline.timer
Enable this timer to allow snapper to take clean up its snapshots.
sudo systemctl enable --now snapper-cleanup.timer
Enable the grub-btrfs service.
sudo systemctl enable --now grub-btrfsd.service
By default, snapper creates a new snapshot on every boot. You can disable this behaviour using the following command.
sudo systemctl disable --now snapper-boot.timer
Reboot the system.
10_linux grub configuration file
Open /etc/grub.d/10_linux with a text editor and navigate to the following segment:
| |
remove rootflags=subvol=${rootsubvol} from the GRUB_CMDLINE_LINUX string:
| |
Do the same thing for /etc/grub.d/20_linux_xen and update grub using:
sudo update-grub
This allows grub to look for kernel and root directory in the correct location after each rollback.
Test out booting from a snapshot
Let’s install a simple package like hello.
sudo apt install hello
Now let’s see the snapshots that snapper has created for this action:
kubuntu@kubuntu:~$ snapper list
 # | Type   | Pre # | Date                              | User | Cleanup | Description | Userdata
---+--------+-------+-----------------------------------+------+---------+-------------+---------
0  | single |       |                                   | root |         | current     |
1  | pre    |       |                                   | root | number  | apt         |
2  | post   |     1 |                                   | root | number  | apt         |
There are two snapshots. One is taken before the action is performed (pre) and one is taken after it (post).
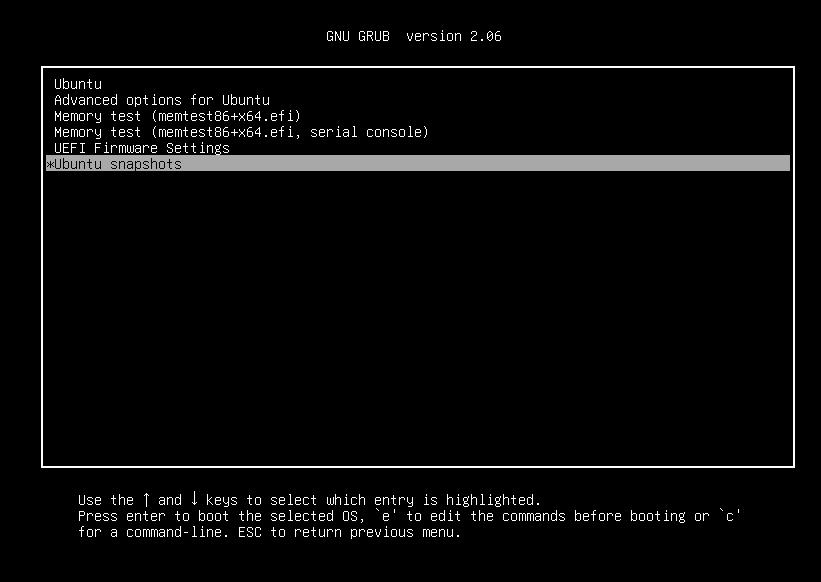
Now reboot. In the boot menu you should see Ubuntu Snapshots as an option. Choose it and select the pre apt snapshot and select a kernel after that. After booting into this read-only system you can see that you don’t have the hello binary anymore and that apt has no record of installing it.

arash@kubuntu:~$ hello
Command 'hello' not found, but can be installed with:
sudo apt install hello              # version 2.10-3, or
sudo apt install hello-traditional  # version 2.10-6
and
arash@kubuntu:~$ sudo apt list --installed | grep hello
returns no result. Issuing snapper list tells you which snapshot you are currently booted into using a - next to the snapshot number.
Please note that this is a read-only snapshot, and you cannot change the contents of the snapshot (for example trying to install anything with apt would fail). You can however change the contents of other subvolumes such as home. This is why we chose to put the contents of some subdirectories of /var such as /var/log under separate subvolumes so that the system would be able to boot.
Reboot into the default entry of grub (your original system).
Rollbacks
In case the system gets broken, we want to be able to boot into a working read-only snapshot, issue a rollback command, and reboot into a normal writable snapshot by default. OpenSUSE achieves this by patching the grub2 source code and adding extra functionalities that allow grub to boot into rollback snapshots directly and by default. (search for btrfs in source files and you will see the patches)
BTRFS default subvolume
From the btrfs docs:
A freshly created filesystem is also a subvolume, called top-level, internally has an id 5. This subvolume cannot be removed or replaced by another subvolume. This is also the subvolume that will be mounted by default, unless the default subvolume has been changed (see btrfs subvolume set-default).
This means that when we changed the default subvolume to @ in the previous sections and did not specify subvol= in the mount options of / in our fstab file, the default subvolume of the btrfs system would be mounted at / (in our case @). Snapper uses this functionality to roll back to a snapshot. It changes the default subvolume of the btrfs filesystem to the snapshot we want to roll back into and the OS using the fstab file that we provided mounts that default subvolume unto /.
Early grub configuration file
Normally, when your system is turned on, the EFI firmware calls the grub bootloader, grub reads the initial grub.cfg configuration file that is stored at /boot/efi/EFI/ubuntu/grub.cfg and that configuration file calls into the main grub.cfg stored in /boot/grub/grub.cfg that is generated by update-grub and in turn by grub-mkconfig.
Let’s compare the file early grub configuration file that Ubuntu uses to that of OpenSUSE with their patched grub2 package.
Ubuntu’s configuration arash@kubuntu:~# cat /boot/efi/EFI/ubuntu/grub.cfg:
| |
OpenSUSE’s configuration arash@opensuse ~# cat /boot/efi/EFI/opensuse/grub.cfg:
| |
as you can see the grub2 package of OpenSUSE supports the btrfs_relative_path option. This allows grub to choose the /boot/grub/grub.cfg file that resides in the default subvolume of the btrfs filesystem (in our case the snapshot that we have rolled back into). Ubuntu on the other hand, has a static path for /boot/grub/grub.cfg under the @ subvolume.
To fix this issue, we install a plugin for snapper that changes line 2 in /boot/efi/EFI/ubuntu/grub.cfg to the snapshot that we want to roll back into, for example:
| |
Snapper EFI plugin
To achieve the behaviour described in the previous section, create a file named 99_efi in /usr/lib/snapper/plugins and add the following script into it and make it executable using chmod +x 99_efi.
| |
Every time snapper performs an action it calls all the plugins it has with the name of the action as its argument. This script changes the entry in /boot/efi/EFI/ubuntu/grub.cfg so that it points to the location of the new default snapshot that snapper rollback has set.
Perform the first rollback
Using snapper list and snapper remove <list of snapshot numbers> delete all the previous snapshots.
Install cowsay using apt, reboot the system and boot into the pre snapshot (where cowsay is not installed).
Perform the very first rollback using:
arash@kubuntu:~$ sudo snapper --ambit classic rollback
Ambit is classic.
Creating read-only snapshot of default subvolume. (Snapshot 3).
Creating read-write snapshot of current subvolume. (Snapshot 4).
Setting default subvolume to snapshot 4.
The contents of /boot/efi/EFI/ubuntu/grub.cfg should also indicate that grub will use the configuration file in snapshot 4.
| |
Now reboot the system. The default grub entry should boot you into snapshot 4. You can confirm this using the following commands:
- First make sure that
cowsayis indeed not available anymore in this system. - Run
sudo btrfs snapshot show /and confirm that the subvolume mounted at/is the snapshot we rolled back into.
Please note that --ambit classic is only needed on the first ever rollback. After that you can roll back using:
sudo snapper rollback
update-grub after each rollback
In your new rolled back system, check the contents of /boot/grub/grub.cfg. You can see that grub still invokes the kernel from the previous default subvolume of the btrfs filesystem
...
linux   /@/boot/vmlinuz-6.2.0-27-generic root=UUID=84cc93cb-d382-45f8-a0f0-79a0316ba88f ro  quiet splash $vt_handoff
initrd  /@/boot/initrd.img-6.2.0-27-generic
...
To fix this, after you boot into your rolled back system for the first time, you must update grub using
sudo update-grub
This makes sure that the default entry in grub points to the kernel inside the rolled back snapshot instead of the kernel in previous system. Now /boot/grub/grub.cfg points to the correct kernel:
linux   /@/.snapshots/4/snapshot/boot/vmlinuz-6.2.0-27-generic root=UUID=84cc93cb-d382-45f8-a0f0-79a0316ba88f ro  quiet splash $vt_handoff
initrd  /@/.snapshots/4/snapshot/boot/initrd.img-6.2.0-27-generic
Delete the contents of the original root subvolume @
Since from now on you will always boot into a snapshot subvolume, you won’t be needing the contents of @.
First mount it at /mnt:
sudo mount /dev/vda2 /mnt -o subvol=@
and then delete all the files (make sure you only delete the files inside @ and not the files of other subvolumes nested inside @).
| |
Conclusion
You can now enjoy your rock solid system. If you happen to mess up system configuration or an update bricks your system, you can easily boot into a working snapshot and issue a rollback command from there. I find this method a suitable alternative for immutable distros for people who may not want to fully commit to them.
Snapper also includes a lot of other features such as undoing changes and seeing the difference between snapshots. You can check out the documentation of snapper for more info.
Resources
The following resource helped with the creation of this guide: